Saturday, 18 August 2018

How to Find and Change the iTunes Media Folder Location

How to Find and Change the iTunes Media Folder Location


Part 1: Find and Change the iTunes Media Folder Location

Please enter Preferences to start the process.

If you are using MAC, choose iTunes > Preferences


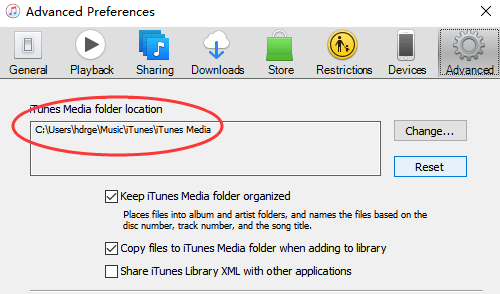
If you are using Windows, choose iTunes > Edit > Preferences

Once you enter the Preferences section, click on the Advanced tab. Once you click it, you will see a grey box under "iTunes Media folder location".

To proceed towards location change, click Change button followed by entering the new changed location.


Note: Once you change the location setting for your folder, file consolidation is required to move the files to the new location. To do so, choose File > Library > Consolidate files from the top menu bar of the iTunes window and click OK.
Part 2: Keep Your Media Folder Organized

Follow the easy step to keep your media folder totally organized.


For now, check:Free iTunes/iPhone Backup Extractor for iPhone, iPadJihosoft iTunes Backup Extractor is a powerful tool to recover and extract important data from iPhone, iPad & iPod touch backup on Windows or Mac.


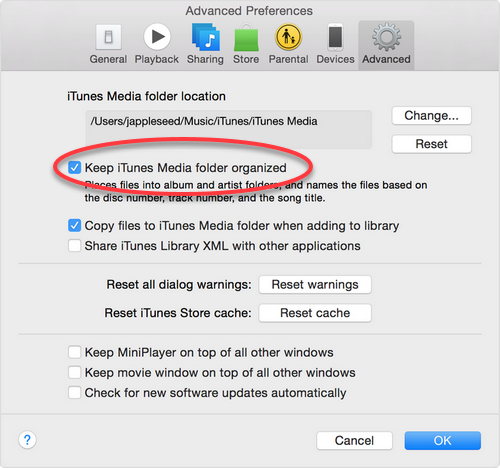
Go to the Preferences > Advanced tab (steps mentioned above).

Select "Keep iTunes Media folder organized" to keep your files organized into folders based on information, such as album and artist and to name them basis the track number, disc number or song title.


You may also like:Gihosoft Total Video Converter is a professional all-in-one video tool that enables you to convert videos and audios into various different formats. You can also download videos from YouTube or other online video sharing sites and convert them easily. Plus, you’re able to personalize your videos with its inbuilt editor, such as, trimming, cropping, applying video effects, adding watermark, subtitles, and more. If you need a powerful and professional desktop video converter program, just download Total Video Converter and follow the step-by-step guide here to have a try.


Friday, 10 August 2018

iPhone not Syncing with iTunes After iOS 12 Update

Fix iPhone not Syncing with iTunes After iOS 12 Update

#1 Check Whether Your iPhone is Syncing with iCloud

iPhone will not sync with iTunes if it is already syncing with iCloud. So you will need to make sure that syncing with iCloud is stopped before you try to sync it with iTunes. The method to do this is quite straightforward. Follow these instructions:


Open Settings on your iPhone.


Tap on your Apple ID. It is displayed on the top of the Settings' interface.


Now select iCloud from the list of options and check these options: Photos, Calendars, and Contacts.


If any of the above mentioned options is turned on, then it means it is being synced with iCloud. Turn them off by tapping them and then attempt the sync with iTunes.


#2 Make Sure You Have Logged into iTunes

iTunes does not allow syncing purchased items unless you log in via your Apple ID. So make sure that you are logged in before attempting the sync. Follow these instructions:


Launch iTunes.


Navigate to Account section and see if your email address for your Apple account is displayed there. If not, follow the next step.


If your email address is not shown, then it means you are not logged in. In order to login, click the Sign in option and then type your Apple ID username and password.


After signing in, navigate to Account > Authorizations and then click 'Authorize this computer' option. You may need to enter your password again. Once your computer is authorized, you will be able to sync without any problems.


#3 Try the Wireless Syncing Method

Wireless syncing is another method to sync your iPhone with your computer. It is recommended that you try this method if your iPhone not syncing with iTunes via USB cable. Follow these instructions:

Step 1. Before proceeding, make sure that your iPhone and your computer are on the same wireless network.

Step 2. Next, connect your iPhone to your computer via lightning cable and launch iTunes.

Step 3. On iTunes, click the summary dialog of your connected iPhone and check the option named as 'Sync with this iPhone over Wi-Fi'.


Step 4. Now on your iPhone, open Settings and navigate to General > iTunes Wi-Fi Sync and choose the Sync now option.


Gihosoft Total Video Converter is a professional all-in-one video tool that enables you to convert videos and audios into various different formats. You can also download videos from YouTube or other online video sharing sites and convert them easily. Plus, you’re able to personalize your videos with its inbuilt editor, such as, trimming, cropping, applying video effects, adding watermark, subtitles, and more. If you need a powerful and professional desktop video converter program, just download Total Video Converter and follow the step-by-step guide here to have a try.


Jihosoft Android Data Recovery: the best Android Data Recovery software for Windows and Mac to recover deleted contacts, messages, photos, videos, WhatsApp and etc from Android devices.


Gihosoft Free Android Data Recovery can help you easily recover lost data such as photos, videos, contacts, text messages, WhatsApp & Viber chats from Google Pixel/XL or other Android phones effortlessly.


If you lost videos from iOS Camerall Roll which are nowhere to download again, you can use Gihosoft iPhone Data Recovery to get back deleted videos from iOS device including iPhone, iPad and iPod Touch.


Any app suggestions or topic recommendations are appreciated in the comments down below.


How to Remove Passcode from iPhone (iPad) 2019 guide

How to Remove Passcode from iPhone (iPad) 2019 guide
If you want to remove passcode from your iPhone or iPad, then it is recommended that you use the DFU mode. This is a common method to remove the passcode that many iOS users use. Follow these instructions:
Step 1. Connect your iPhone to your PC and open iTunes.
Step 2. Once your iPhone is detected in iTunes, open DFU mode on the device. Different iPhones require different methods to go into DFU mode. On iPhone 7/7 Plus, you will need to press the Volume Down and Side button and hold them until a recovery-mode screen appears.

Step 3. When an option to Update or Restore appears, choose Restore.

Step 4. iTunes will now begin the restoring process and download software for your device. Once the process is completed, the passcode will be removed and you will be able to set up your device with ease.
Do you like this story?
Sponsor Ads:
Gihosoft iPhone Data Recovery is a professional iPhone Data Recovery software to get back all your lost text message, photo, video, call history, note, contact and more from iPhone/iPad/iPod Touch. It offers a full solution to recover your lost data in different tough situations. Besides recovering data directly from iPhone, iPad and iPod touch, it also allows you to recover data from iCloud and iTunes backup files.

Wednesday, 8 August 2018

How to Fix FaceTime Unavailable with iOS 12?


How to Fix FaceTime Unavailable with iOS 12?
1 Check whether FaceTime is Available in Your Country

If you have bought your iOS device from Saudi Arabia, UAE or from Pakistan, FaceTime feature might not be available in your country. However, if you use a device that runs on iOS 12 and you have purchased it in Saudi Arabia, you can now enjoy FaceTime.
2Check FaceTime & Restriction Settings

If FaceTime is already disabled in your iOS device, you will have to turn it on. Here’s how to do it.


Go to the Settings App located on your device’s Home Screen.


Select FaceTime.


Now, find the switch located next to FaceTime and turn the switch on.


If restriction was the problem, FaceTime should work by now.


3Reset Network Settings

Sometimes, if your network settings are changed or it has some kind of an error, you will be not able to use FaceTime properly. Here’s how to fix network settings of the iPhone.


Go to Settings app on you iOS device.


Select the option called General.


Tap Reset and tap on Reset Network Settings.


When prompted, you will have to confirm the massage to reset the network settings of your iPhone


Once the iOS device is rebooted, the network settings will be reset and you will be able to use FaceTime feature.


4Change Another WiFi Connection

If there is a trouble with your existing Wi-Fi connection, FaceTime keeps failing can be a frequent issue. So, it is worth trying a new Wi-Fi connection. Here’s how to change your Wi-Fi connection.


Go to the Settings app located in your device’s home screen and select Wi-Fi option.


You should turn on Wi-Fi. If it is already turned on, you will see the available connections.


Now, tap on the new Wi-Fi network you need to connect to.


You should provide the password of the respective Wi-Fi network in order to join.


Once joined, the device will notify it with a ‘right’ mark just next to the network.


5 Restart Your Device

You can also try restarting your device and see if FaceTime works. The purpose of restarting your iPhone is to fix some minor issues. Here’s how to restart your iOS device.
If you are using an iPhone X:


Press the side button and any volume button simultaneously and hold them.


Once the slider appears, drag it to turn the iPhone X off.


Now, you should press and hold the Side button until the Apple logo appears on the screen.


If you are using an iPhone 8 or an earlier version:


Press and hold the Top button until you see the slider.


Drag it to turn the device off.


Once the device is turned off, you should press and hold the Top button to see the Apple logo.


6Reset All Settings

If you believe that there are several issues related to the settings, it is easier to get them all reset. Here’s how to do it.


Go to the Setting app of the iPhone though Home Screen.


Go to General.


Tap on Reset which is located towards the bottom of the screen.


Now, you should find an option called Reset All Settings.


Tap it and enter the passcode when prompted.


During process, if you lost any important data, you can use Gihosoft iPhone Data Recovery. Even if your iPhone stuck in recovery mode, you can also use this software to rescue photos and videos in iPhone recovery mode.


You may also like:Gihosoft Total Video Converter is a professional all-in-one video tool that enables you to convert videos and audios into various different formats. You can also download videos from YouTube or other online video sharing sites and convert them easily. Plus, you’re able to personalize your videos with its inbuilt editor, such as, trimming, cropping, applying video effects, adding watermark, subtitles, and more. If you need a powerful and professional desktop video converter program, just download Total Video Converter and follow the step-by-step guide here to have a try.


Friday, 3 August 2018

Top 7 Best Android Data Backup & Recovery App in 2018-2019

Top 7 Best Android Data Backup & Recovery App in 2018


One of the most important tasks that people often ignore is keeping a backup of their valuable digital data. There is always a risk of losing your files. Your device may get damaged, and firmware updates may format your device. If you are an Android user, thankfully there Android backup apps that can take care of your data and store them offline or in the cloud securely. Moreover, such apps can run on regular intervals and backup without user intervention.

Note: This list isn’t in order of preference. Readers are advised to choose any app that suits their needs.
7 Free And Best Android Backup Apps Of 2018-2019
1. App/SMS/Contact- Backup & Restore


App/SMS/Contact- Backup & Restore has a variety of features for backup and restore. It permits you to batch backup, restore, transfer, and share your apps and personal data. You can backup your files to the Google Drive or edit the backup path to store data on your SD card. It has an option for auto-backup that allows you to backup every app installation update automatically.

Moreover, it has a built-in virus scanner, APK files scanner, night mode, and you can also sort your apps by name/date/size. However, the app cannot backup, restore, or transfer data and settings of the apps. The app is free and contains ads.
2. G Cloud Backup


G Cloud is an impressive Android backup app where users need to create an account to store the backups. It provides 1GB of backup space for free. It allows you to save your SMS, call logs, contacts, system settings, photos, videos, and music. You can easily move your files to a new device and also protect personal apps with a passcode. It does not require root privileges or any unique configuration, and even allows backups to external SD cards. You can schedule automatic backups and upload whenever there is a WiFi connection. The app is free, contains ads and in-app purchases.
3. Super Backup & Restore


Super Backup & Restore claims to be one of the fast backup and restore tools for Android. It enables you to backup your apps, contacts, messages, call history, bookmarks, and calendars to your SD card or Google Drive. You can also backup and restore your app’s data. But for that, you need to root your device. Moreover, you can schedule automatic backups. It can also auto-upload scheduled backups to your Google Drive or Gmail. The interface is easy to operate and comes with customizable dark or white theme. The app is free, but the ads can be annoying. There is also a pro version of the app that is ad-free.
4. Google Drive


It is a free massive cloud storage service from Google that provides basic storage of 15GB which is enough to store your photos, files, and other documents. You can access your virtual Google hard drive from any device no matter on which platform you are. It also allows you to view your files offline just using simple procedures. Moreover, you can share your files and folders with others and also edit or add comments on any of your files. It is definitely one of the best Android backup apps that can store your information securely in the cloud.
5. App Backup and Restore- Easiest backup tool


This is a reliable and straightforward Android backup and restore app. It allows you to store, archive, or delete backups directly from the main interface. You can batch backup and restore your files, and also set the backup path to your SD card. It has a built-in APK file scanner and virus scanner. Also, you can choose to auto-backup specific apps instead of all apps. Moreover, you can share apps between devices through WiFi and Bluetooth. The app, however, only allows you to backup and restore your APK files, without your application data. It is free and contains ads.
6. Titanium Backup


Titanium backup has been a solid backup app since the early days of Android. It is exclusively for root users and supports almost all Android versions. The app is ad-free and available in both free and premium version. With the free version, you can backup and restore apps along with the app data, SMS, contacts, etc. It also supports backup to SD card. The premium version provides some extra features like syncing to cloud storage, automatic backup, batch restore, app freezer, etc. Overall, the app is quite excellent and worth a try.
7. Contacts Backup & Restore by Simpler


If you’re searching for the best Android contacts backup app, Simpler backup is a straightforward app that does what the name says. It allows you to backup your contacts as a VCF file and works even in offline mode. You can export your backups to DropBox, Google Drive, or SD card. You can also move your contacts between different accounts. Overall, the app is quite basic and easy to operate. It is free with no ads or in-app purchases and is also available in 15 different languages.

Gihosoft Free Android Data Recovery
Gihosoft Free Android Data Recovery is a professional Android file recovery software that enables you to recover deleted photos, music, videos, messages, contacts, call logs, WhatsApp messages, Viber chat history and more from Samsung, Huawei, LG, HTC, Motorola, Google, Oneplus, Sony, Lenovo, ZTE and other Android devices directly.


Did this list help you to find the best Android backup app? Share your reviews in the comments.